Note: The solution requires additional manual configuration, check the Solution Configuration section for the details. Solution Overview The solution allows tracking the upcoming demand of People (individuals), Teams and Agile Release Trains (ARTs) for existing and forthcoming Initiatives, Projects, or any other Work Items, seeing
Trusted by Agile teams at
show more
USER STORIES:
Note: The solution requires additional manual configuration, check the Solution Configuration section for the details.
Solution Overview
The solution allows tracking the upcoming demand of People (individuals), Teams and Agile Release Trains (ARTs) for existing and forthcoming Initiatives, Projects, or any other Work Items, seeing people's availability, and balancing the available and allocated capacity within a specific Period (such as Week, Month, Quarter, Year or Custom Period). Such demand and capacity management approaches are applicable for high-level planning when no work estimates are provided yet, and no lower-level items, such as Features or User Stories, exist. Planning is happening to roughly understand how much capacity is needed for work to be done and find the right people or teams to do the work. It also allows tracking if people, teams or ARTs are going to be overloaded or see who is available to spread the load.
The solution is installed by default for Portfolio Epics (so we create User/Team/ART Work Allocations for Portfolio Epics and track capacity based on this). However, we can connect the capacity solution to any other entity you prefer to do capacity planning for.
Availability in Periods
After the solution installation you'll see new tab Availabilities on User, Team and/or Agile Release Train views. Availabilities represent the information about Total, Reserved and Available Capacity of a User, Team and/or Agile Release Train per a Period: such as Year, Quarter, Month, Week or Period, considering planned effort for a Period.
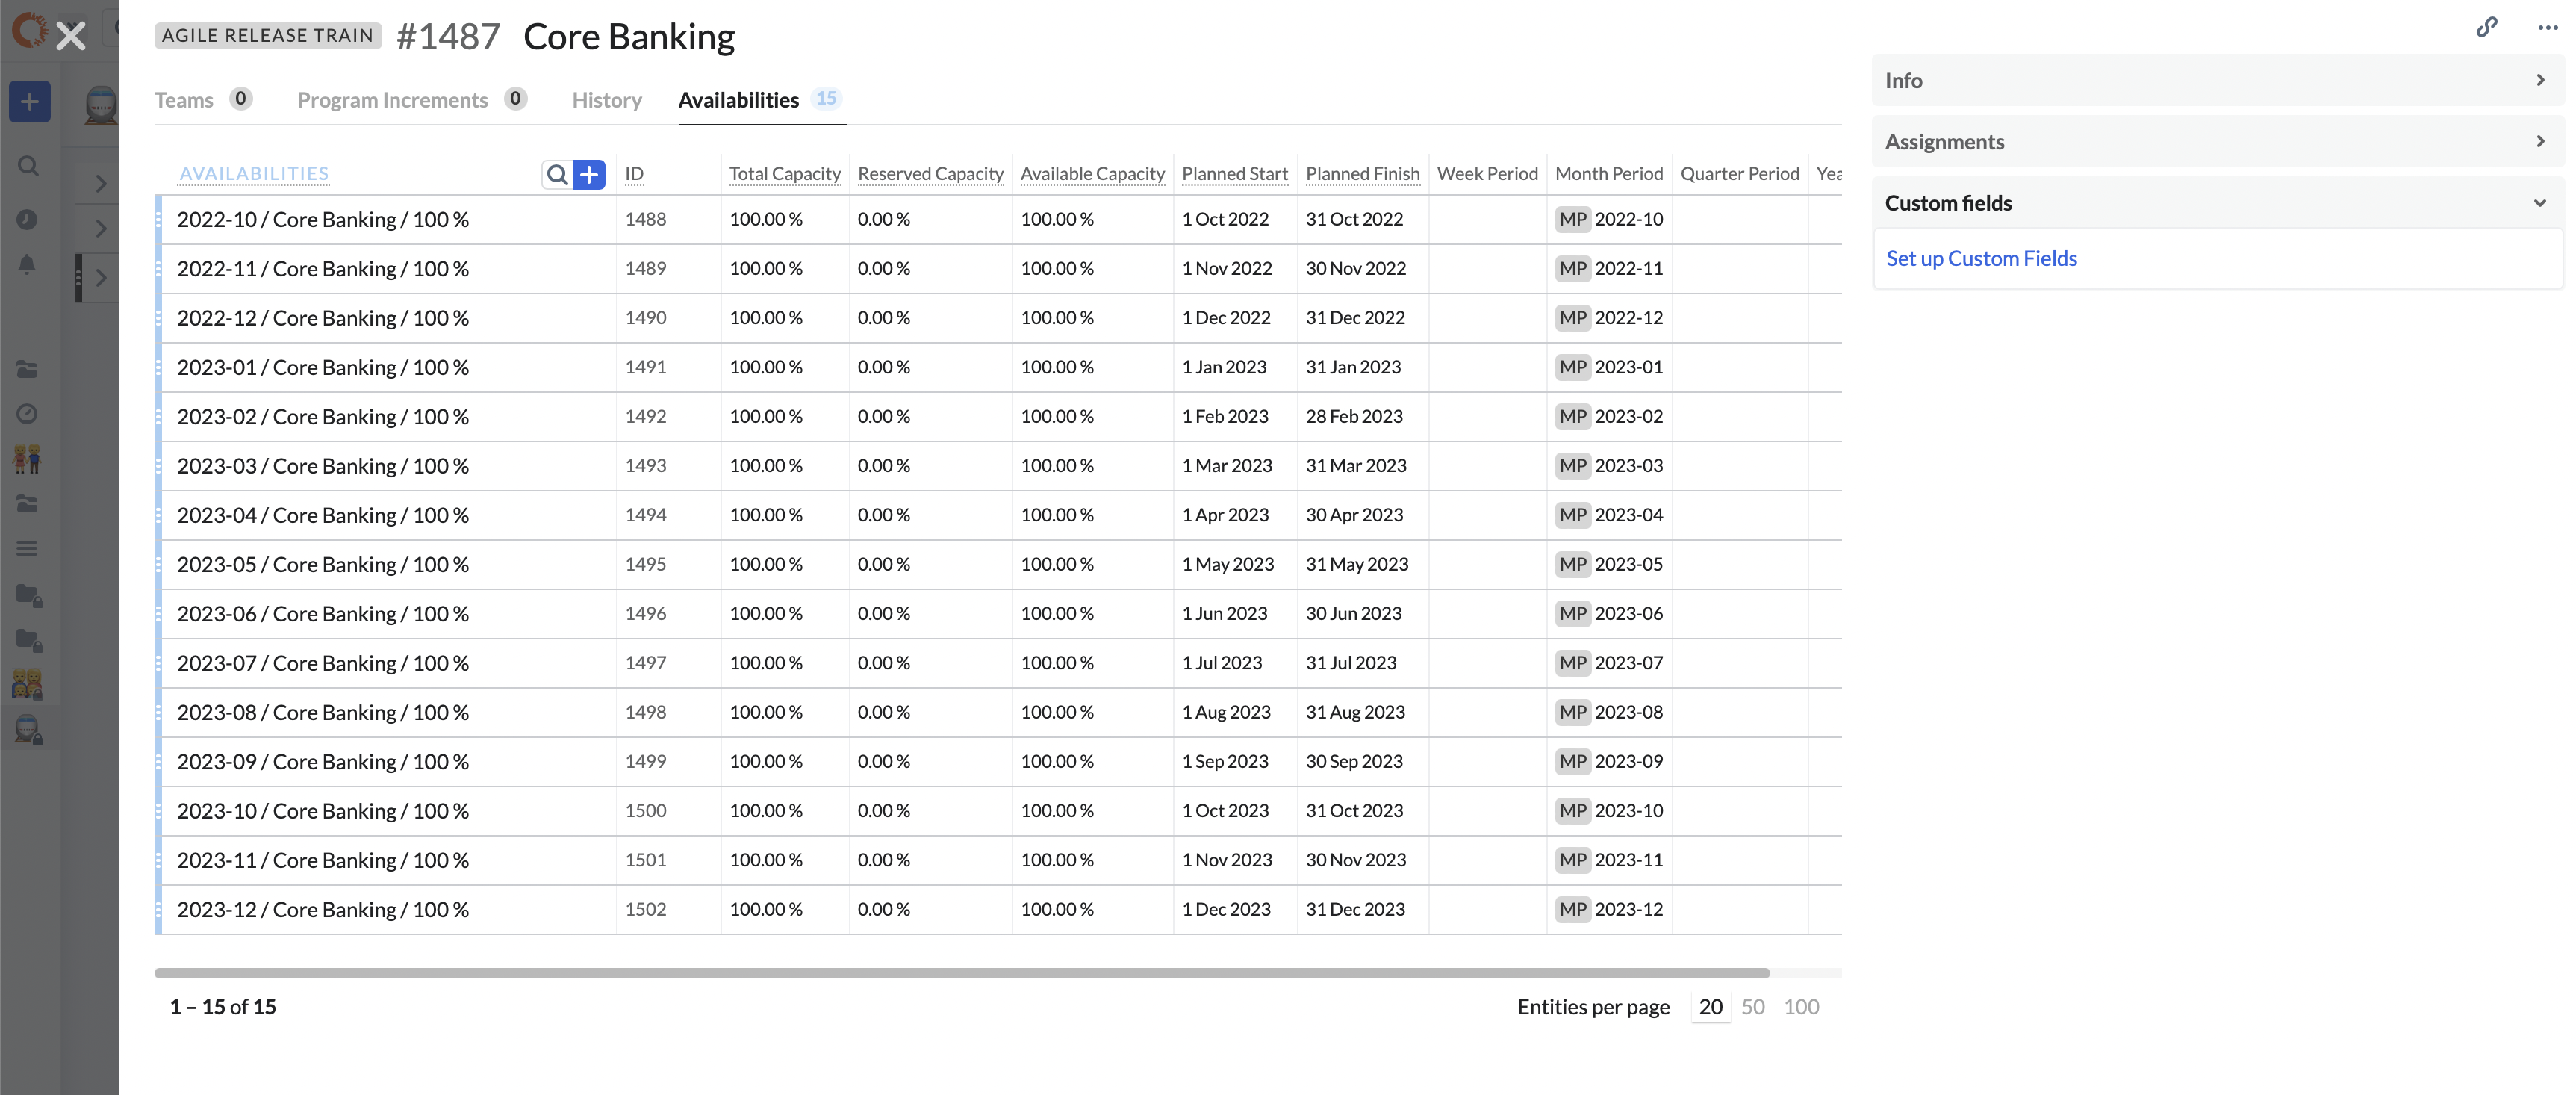
Total Capacity is set automatically and equal to 100% representing total capacity available during a Period.
There are several ways to calculate Reserved Capacity:
- It can be calculated based on Work Allocations. Let's say a User, Team or ART is allocated to a Portfolio Epic from April to August for 100%. Then the Reserved Capacity for these months will be 100% and Available Capacity - 0%.
- It can be entered manually. To enable this you need to make Reserved Capacity custom field non system (editable) in Settings -> Custom Fields. Now you can enter Reserved Capacity manually.
Available Capacity will be calculated as Total Capacity - Reserved Capacity and show how much capacity is available.
Demand and Allocation
There are the following entities are enabled by the solution:
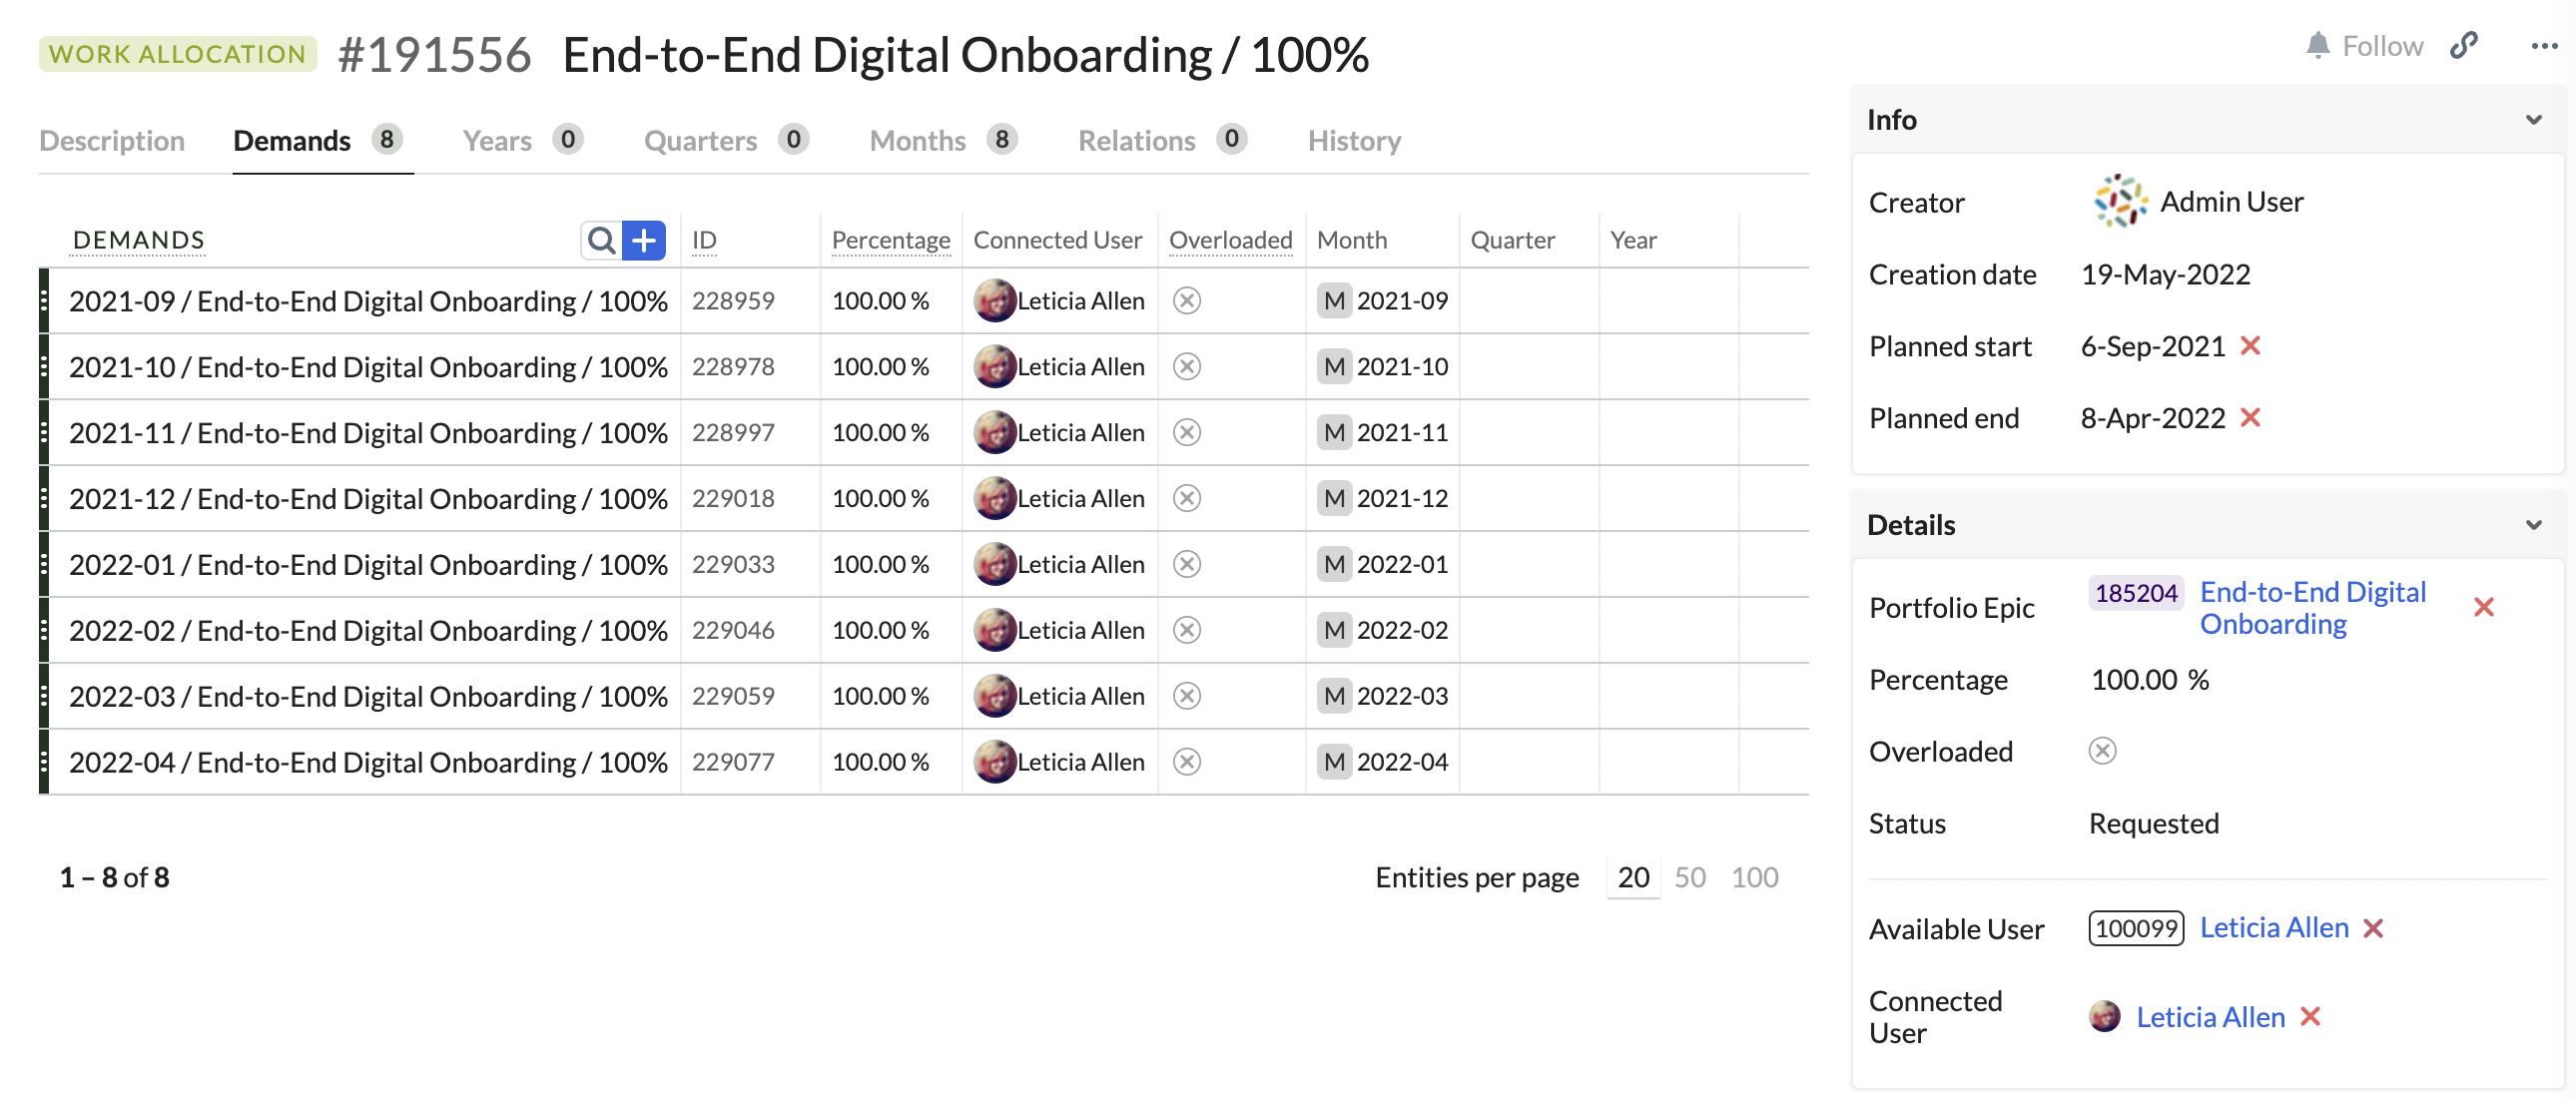
- Work Allocation – represents work demand defining for how long (Planned Start and Planned End dates) and for which Percentage (%) we need a User, Team or ART to work on an item. We can define a specific person User, Team or ART or create a work allocation without defining it if we don't know who it will be or if it doesn't matter at the moment. There can be multiple work allocations for the same User, Team or ART with different % during different Periods.
- Demand - represents demand for a specific Period, i.e. if capacity planning is happening based on a Month Period and a work allocation is planned for 3 months, then the system will automatically create 3 Demands for each Month within this Work Allocation - one Demand for each Period.
Based on created Work Allocations people (Users, Teams or ARTs) can get Overloaded, which means there are Work Allocations for more than 100% in total are created for them for the same Period in future. To solve the Overload you can decrease the Work Allocation %, move Work Allocation to different time frame or allocate different User, Team or ART to the work planned.
There is an option during the solution installation to exclude some specific States of Work Allocations (for example Rejected, Not Valid or any other) from affecting Overload flag.
Solution Flow
1. Define Demand for a Portfolio Epic
To plan capacity and allocations of people, Project Managers or Initiative Owners first should create User, Team or ART Work Allocations for a Portfolio Epic, defining how much of there capacity is needed to work on it. Work Allocations may not have a Connected User, Team or ART if they are unknown yet. Work Allocation can be created either from a Portfolio Epic detailed view or from the Portfolio Epic Demand view in the left menu.
Here you need to define:
- Status of Work Allocation (Requested or Approved, later it also can be Rejected. Work Allocations with Rejected status are not considered in Reserved Capacity.)
- Percentage (%) of capacity requested
- Planned Start and End Dates
- Connected User, Team or ART if known.
When a Work Allocation is created, it’ll be connected to the respective Periods (Weeks, Months, Quarters, Years or Period) based on its Planned Start/End Dates. Demands will be generated automatically for each respective Period. Demands inherit Work Allocation parameters, such as Capacity %, Planned Dates, and a Connected User, Team or ART.
Work Allocations are moved through the their workflow based on either their States or based on Planned Dates using the following logic:
- If a Work Allocation Planned Start Date happens and a Work Allocation is not In Progress (the first state after the Planned state, or the first state after the Initial state if the Planned state doesn't exist in the workflow) state, then it'll be moved to In Progress state, so its Start Date = Planned Start Date.
- If a Work Allocation Planned Start Date happens and a Work Allocation is In Progress state, then nothing happens and the current Start Date will be kept.
- If a Work Allocation Planned End Date happens and a Work Allocation is not in the Final state, then it'll be moved to the Final state, so its End Date = Planned End Date.
- If a Work Allocation Planned End Date happens and a Work Allocation is in the Final state, then nothing happens and the current End Date will be kept.
2. Process Unfulfilled and Overloaded Demand
There are several views for people responsible for fulfilling the demand, as well as ensuring that there won't be overloaded people.
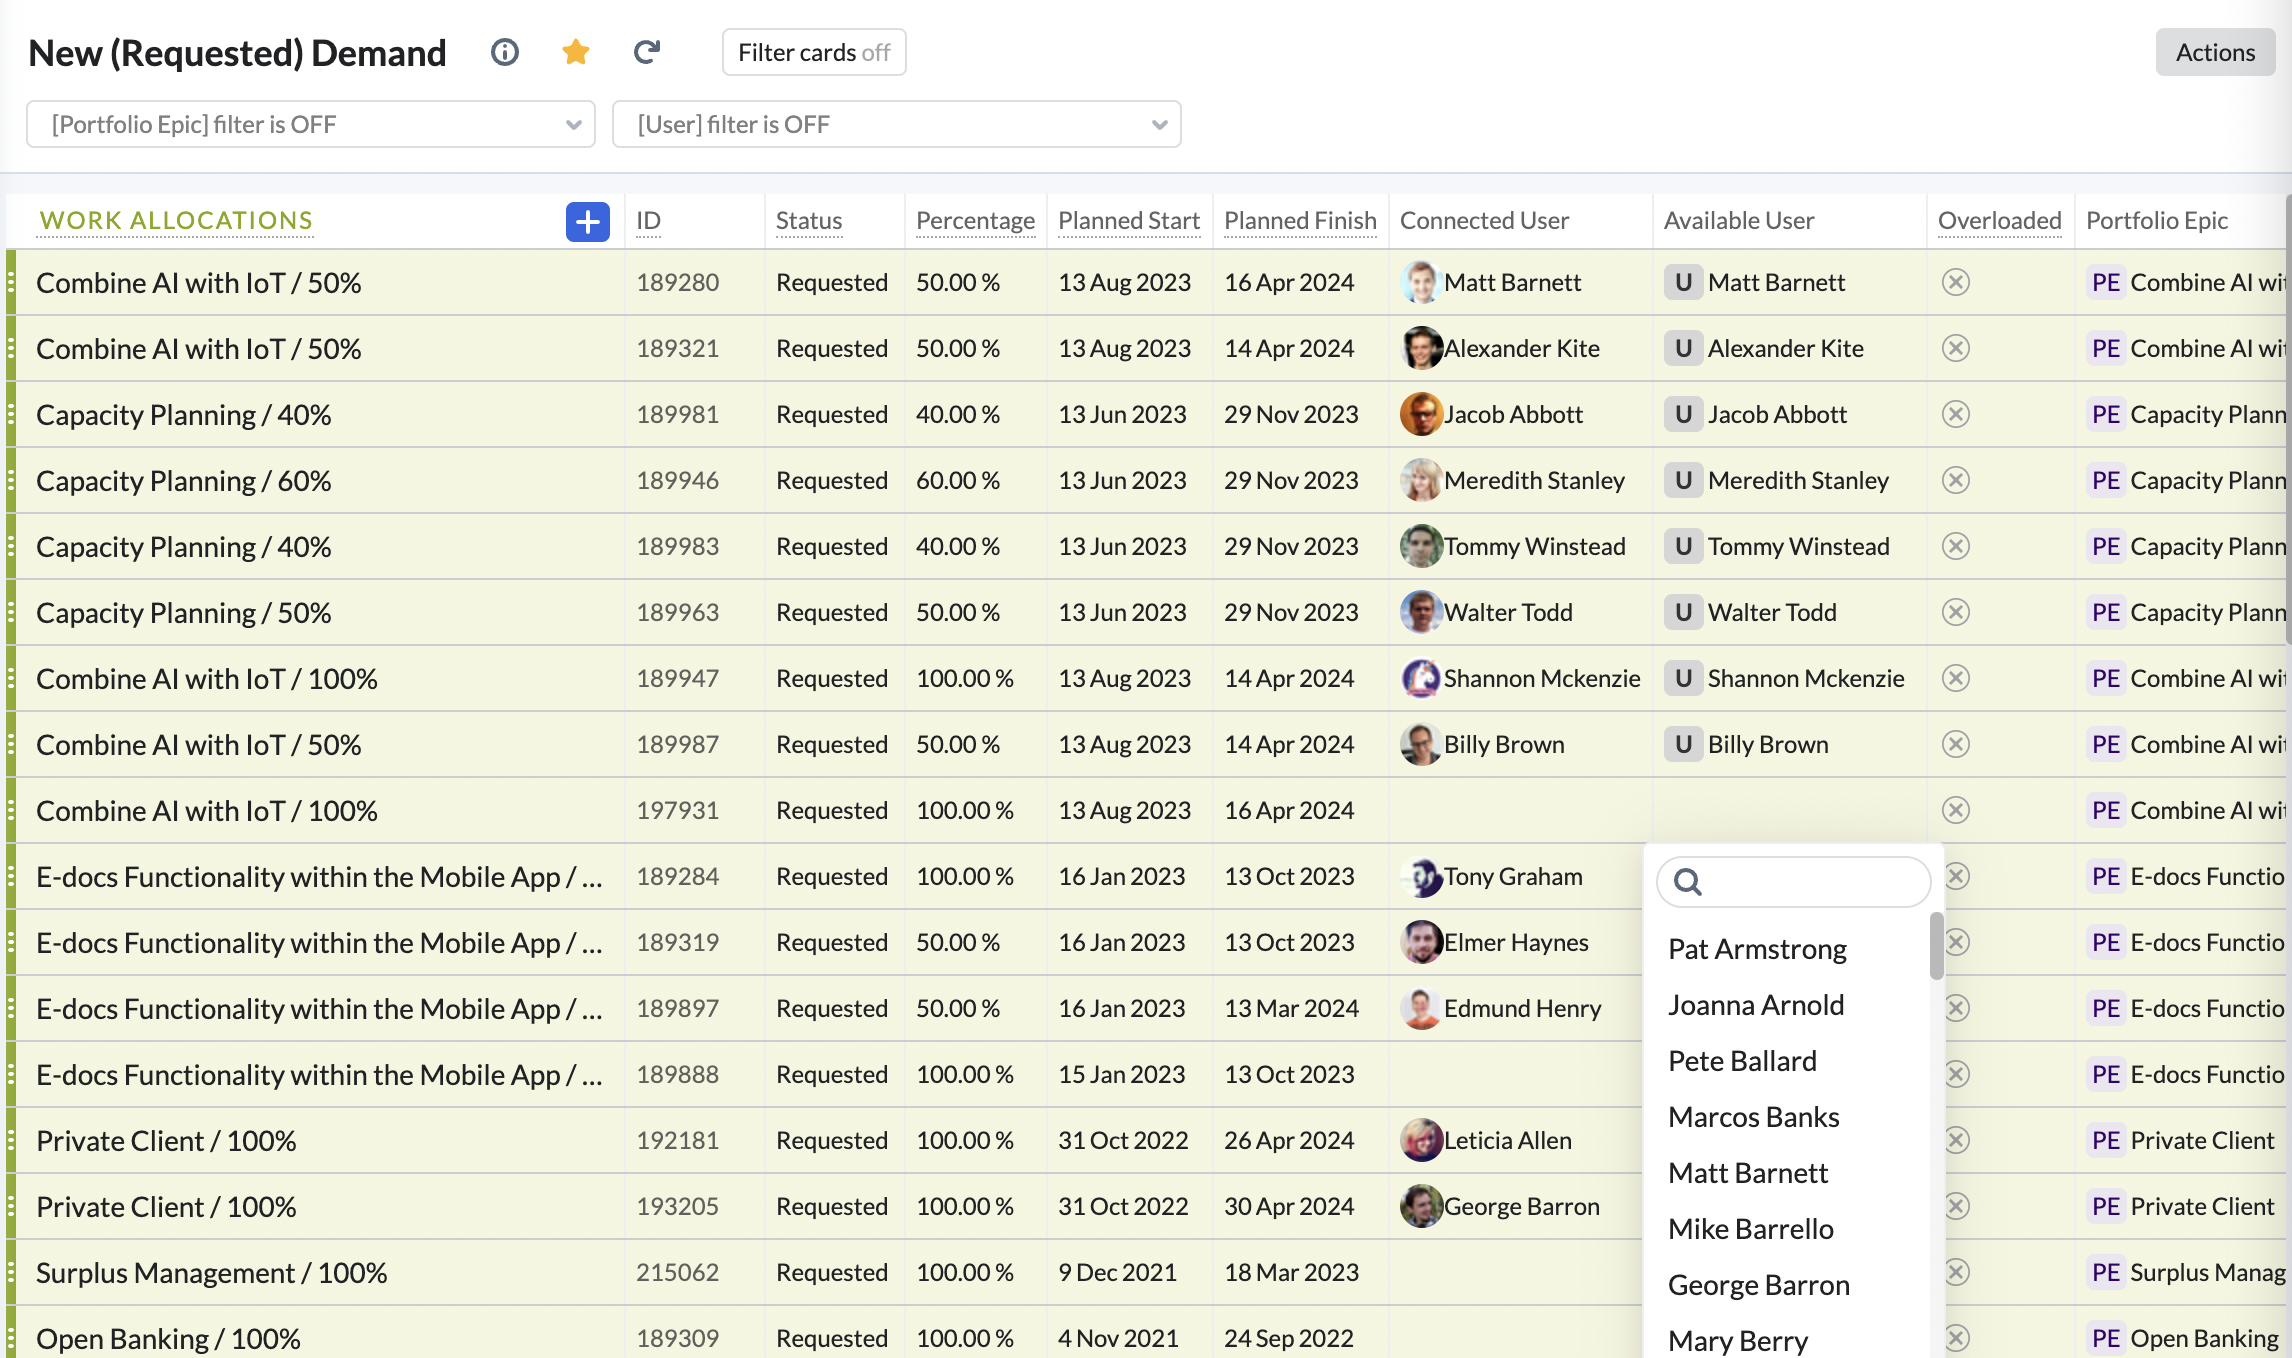
New (Requested) Demand
On this screen you can see all the current and future Work Allocations in the Requested state. Here is a list of already allocated demands (Work Allocations with a Connected User, Team or ART), which need to be Approved, and Work Allocations with no Allocated User, Team or ART, where we need to find people to allocate. In the Available User, Team or ART field you can find people available based on their current load and availability (%) for the needed duration (Planned Start and End Dates of Work Allocation). In Connected User, Team or ART field you'll see all the people in the company. You can choose a person from that list, however, a person might get overloaded when allocated to this Work Allocation.
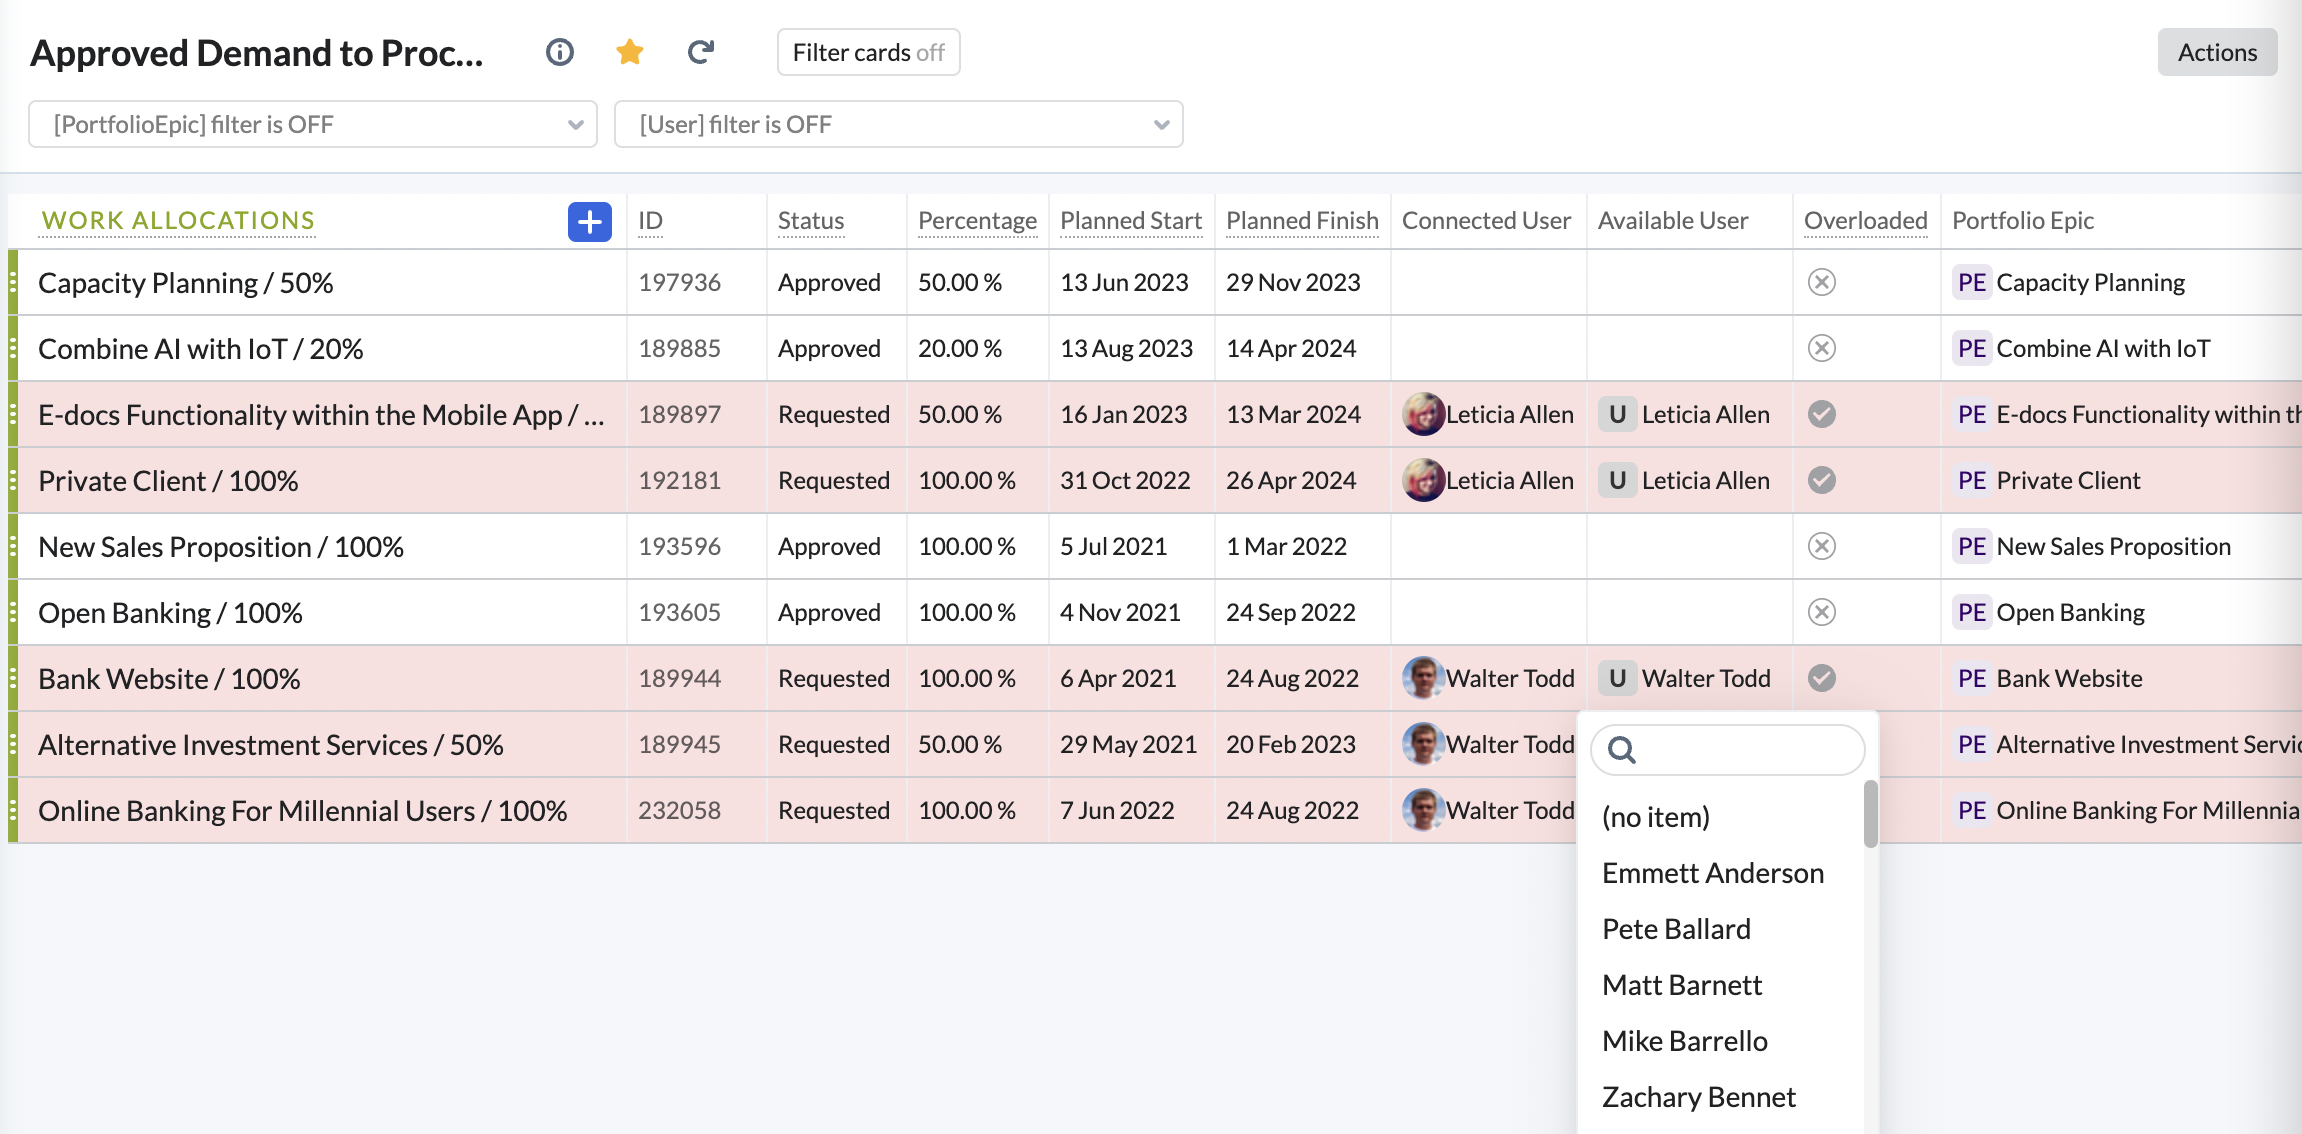
Approved and Requested Demand to Process
There are cases when Work Allocations got Approved however there is no User, Team or ART allocated to it yet, or there are overloaded people. You can see such Work Allocations on the Approved Demand to Process view. Here you can resolve Overloads by choosing another Available User, Team or ART and also can allocate people to the not fulfilled Work Allocations.
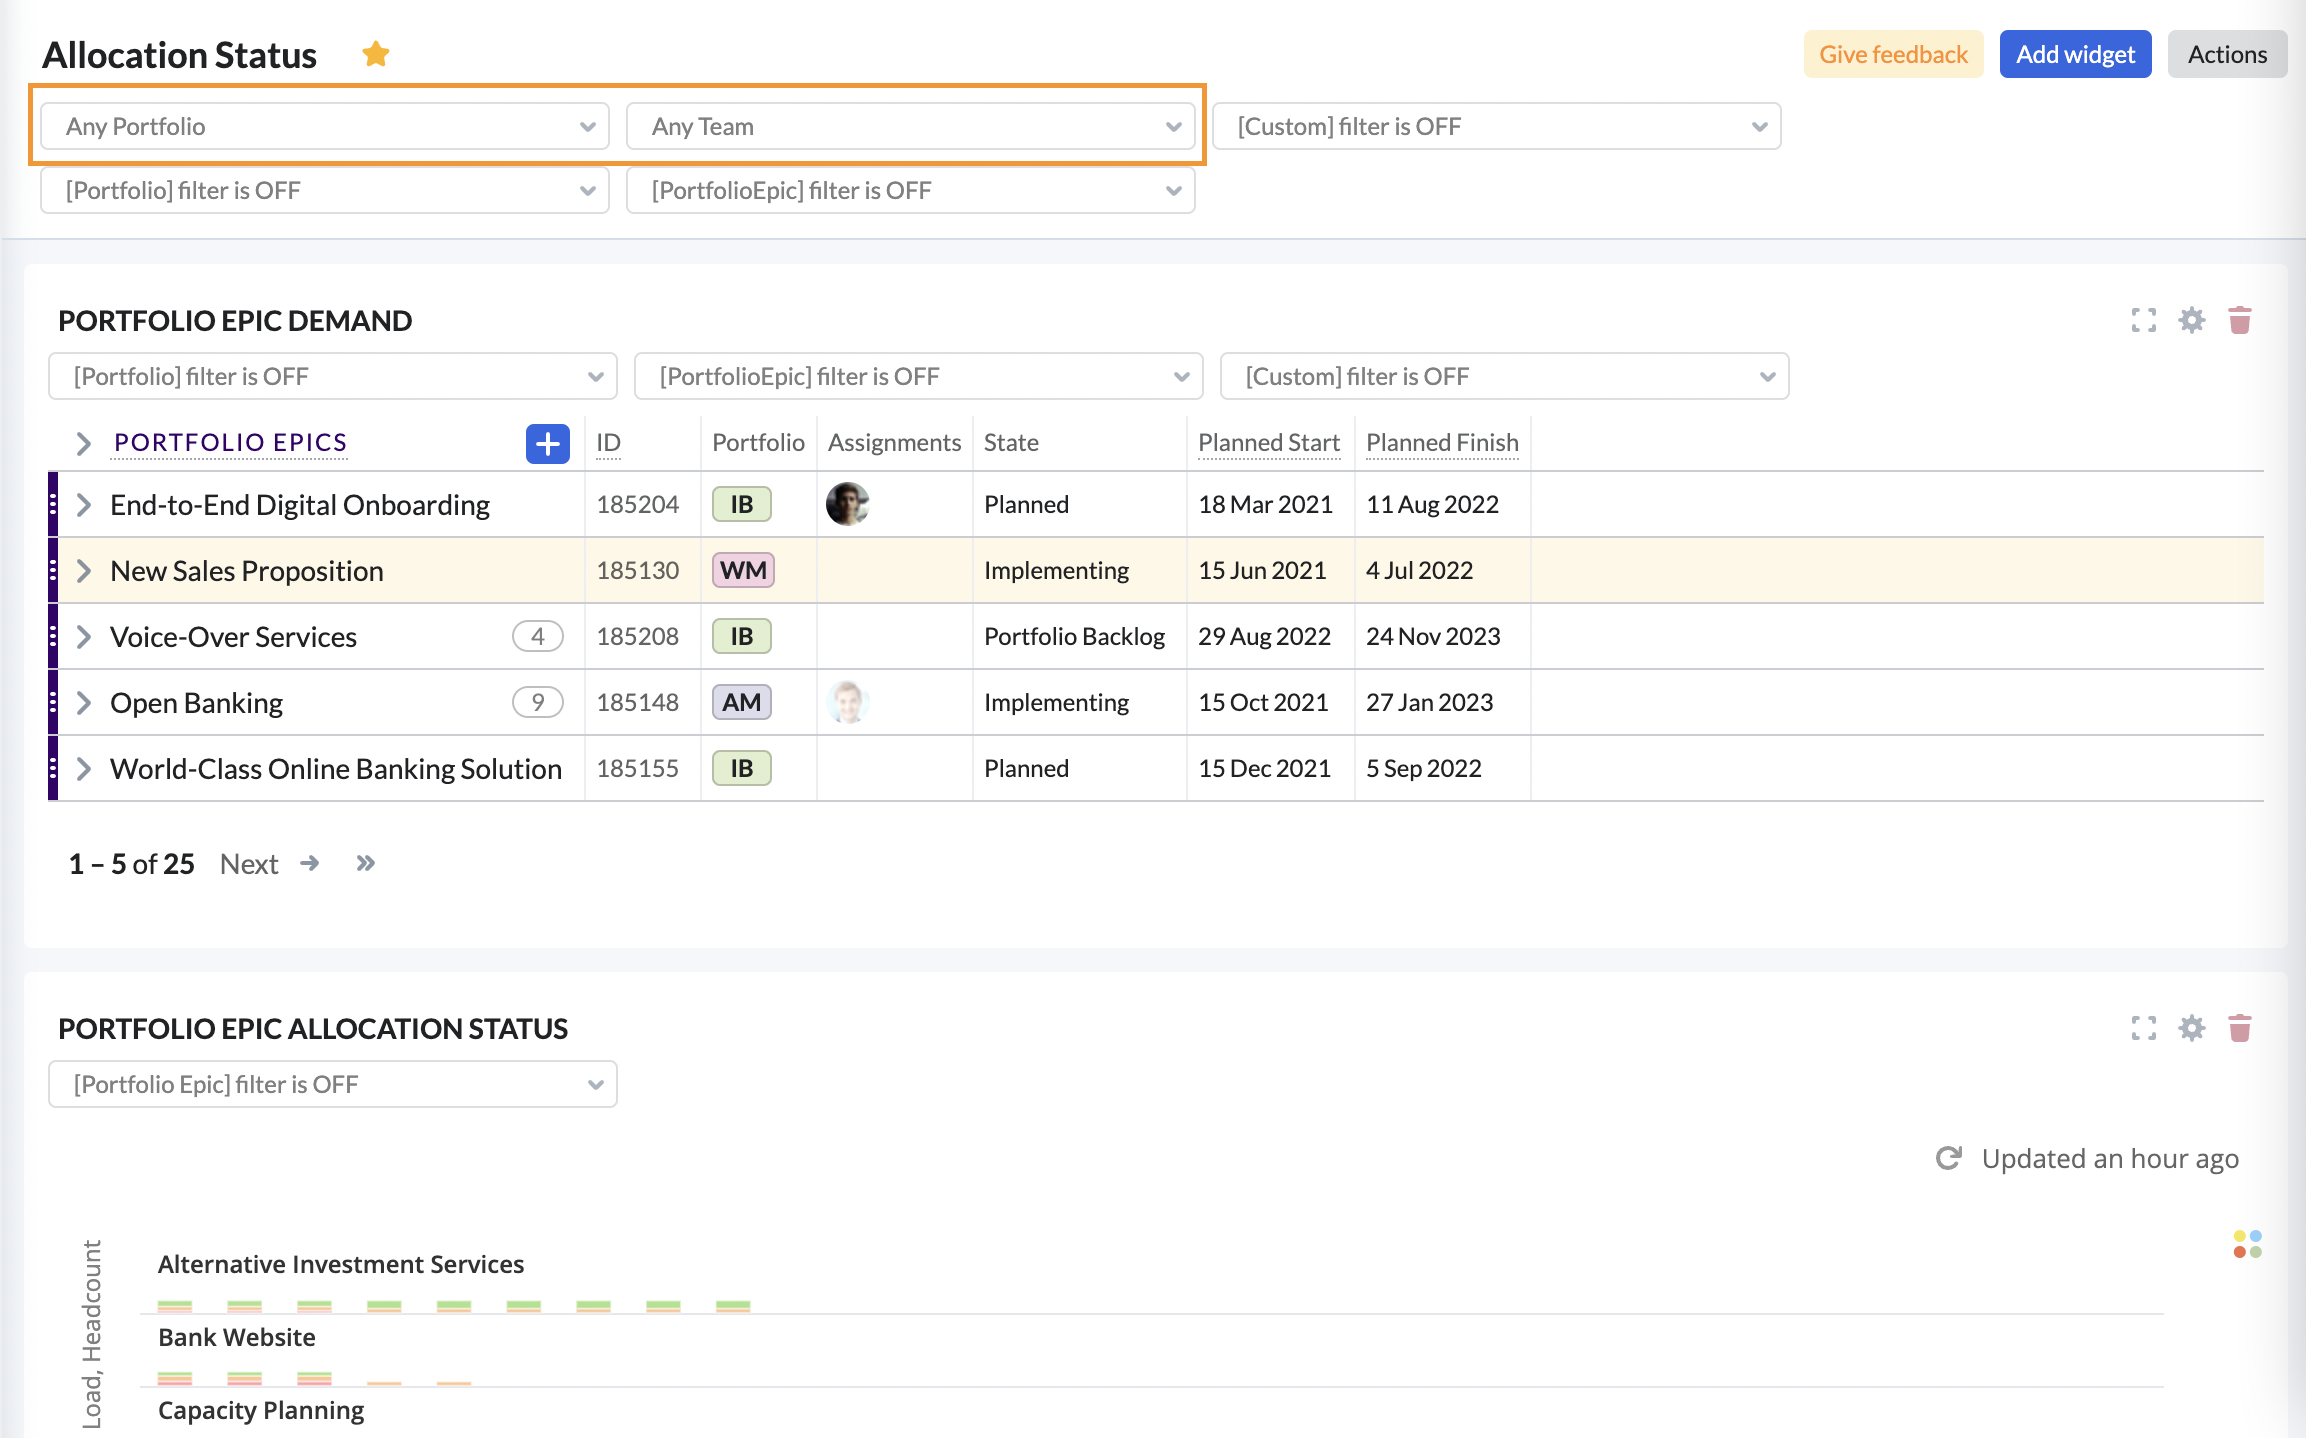
3. Allocation Status Dashboard
This dashboard helps to focus on Portfolio Epics with overloaded people allocated or going to be overloaded in future; see on a chart where in time these people are overloaded and make a change to fix overloads.
4. People Load Dashboard
This dashboard helps to focus on People overloaded across all the Portfolio Epics they work on, as well as see a chart in which Periods they are overloaded and make a change to fix overloads.

Note: After the solution installation, the system automatically adds extra Portfolios and Teams filters to both Dashboards. You need to delete them from the dashboards, as they won't apply correctly to the data on dashboards. To do that:
- Click Actions -> Set up dashboard
- Go to the Setup tab
- Click Portfolios filter
- Uncheck Show in the View header checkbox and save
- Repeat for Teams filter
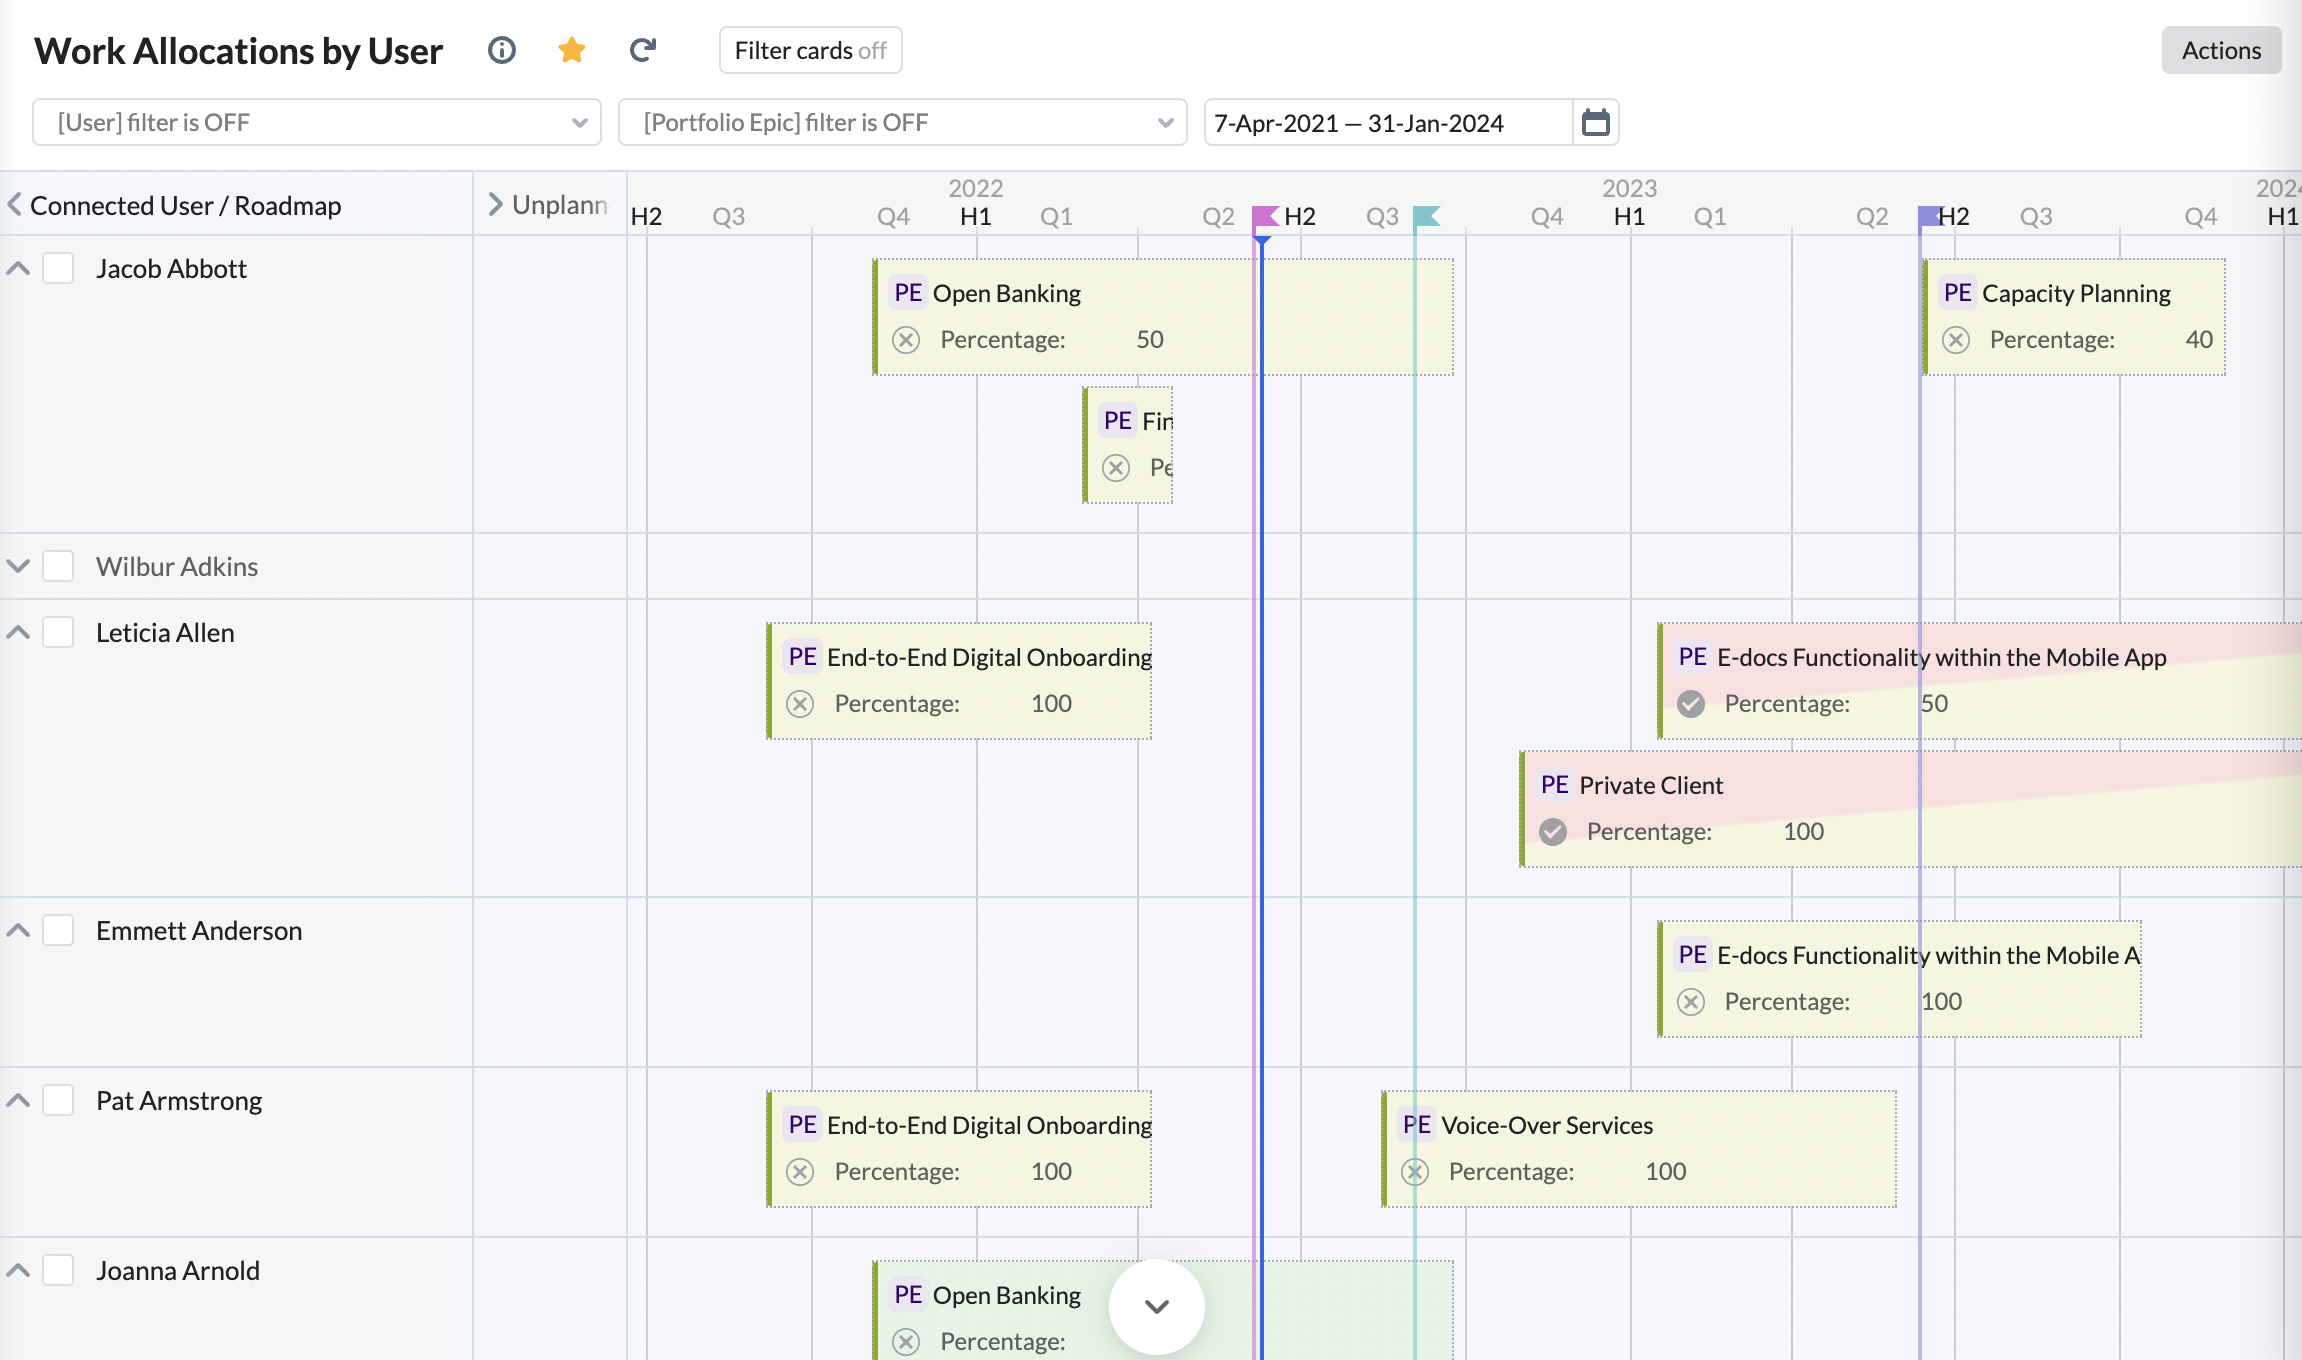
5. Work Allocation Roadmaps
There are two more views where we can see a roadmap of Work Allocations.
The first one shows Work Allocations by User, Team or ART, where we can focus on a specific User, Team or ART and see their Work Allocations across all the Portfolio Epics over time:
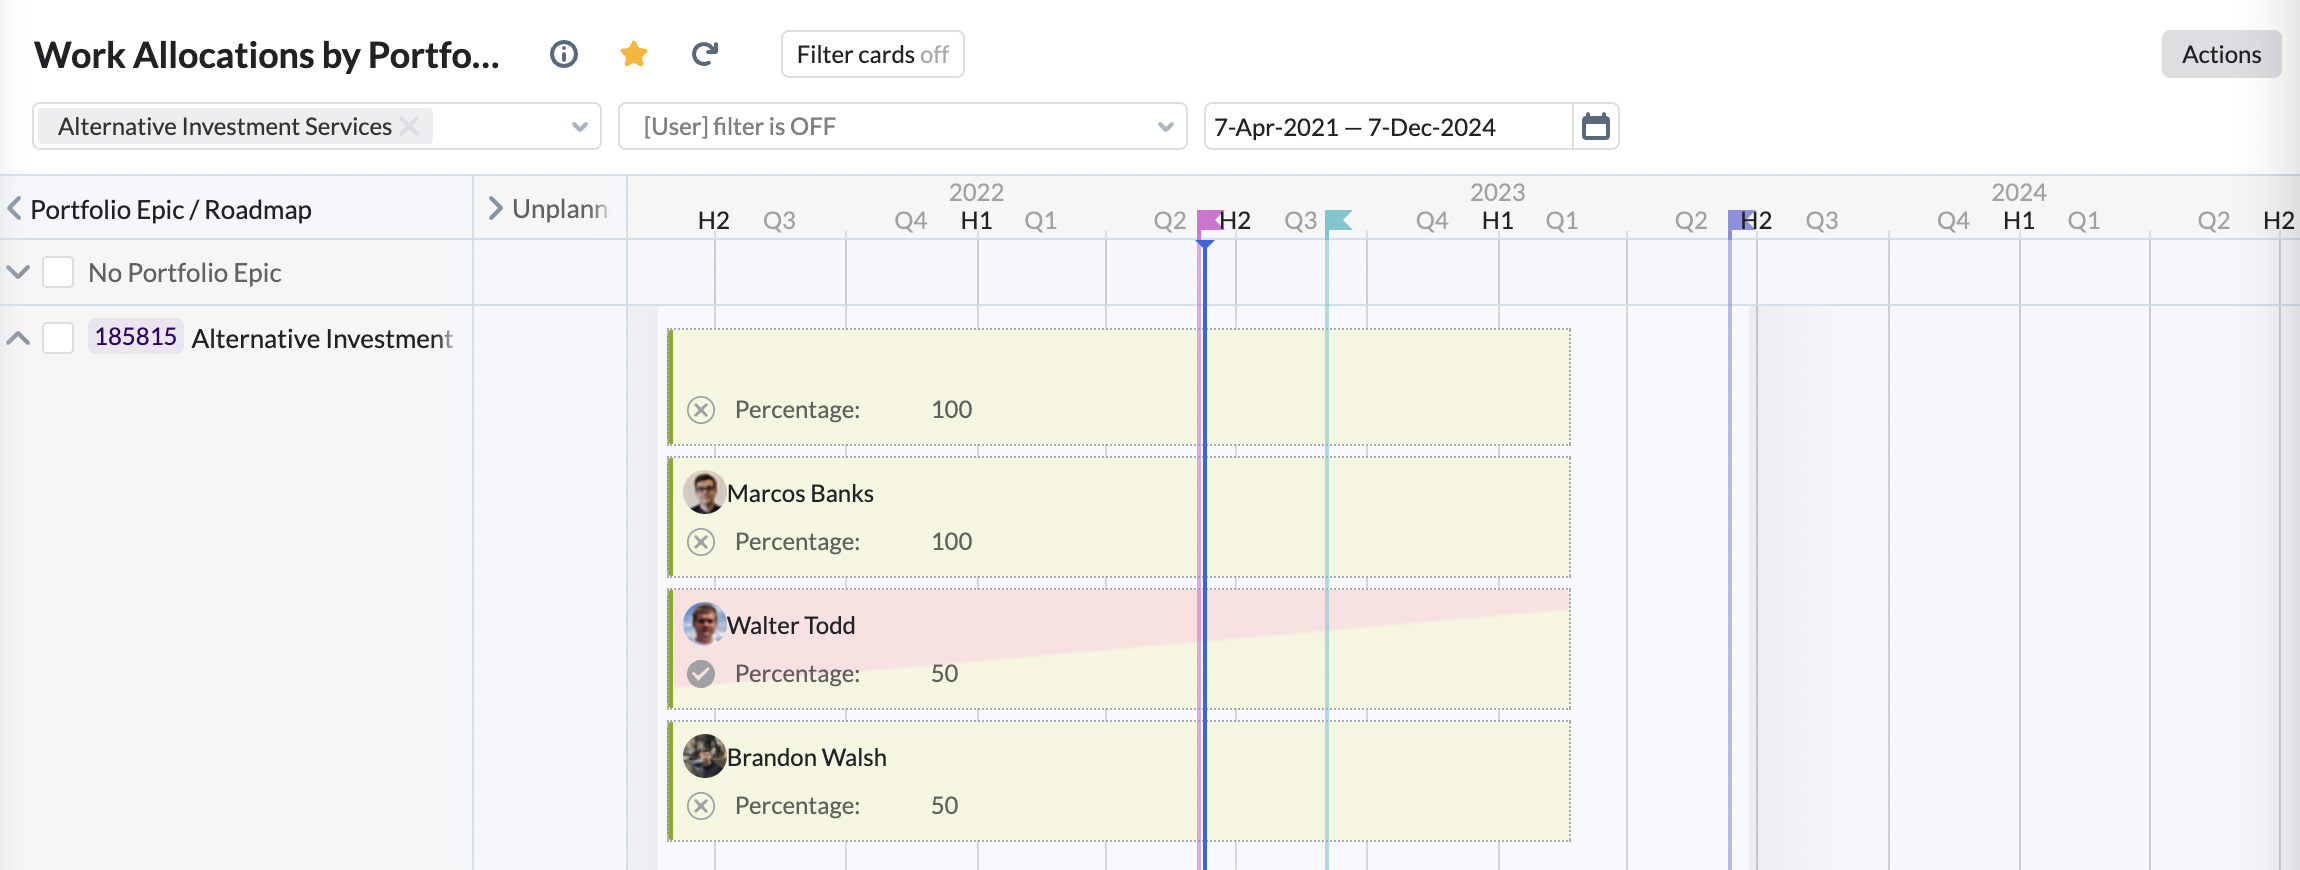
The second one shows Work Allocations by Portfolio Epic, where we can focus on a specific Portfolio Epic and see their Work Allocations for all the Users, Teams or ARTs:
Solution Configuration
Adjust Quick Add (needed only if you use 2 or more Demand and Allocation solutions – for Users, Teams and/or ARTs):
How to adjust Quick Add:
- Go to Settings -> Quick Add
- Select Work Allocation in the list
- Delete Connected User/Connected Team/Agile Release Train
- Add configurable drop-down for Connected User/Connected Team/Agile Release Train
Known Bug: Connected User, Team or Agile Release Train may not appear in Quick Add customisation screen. Please contact us to fix the issue.
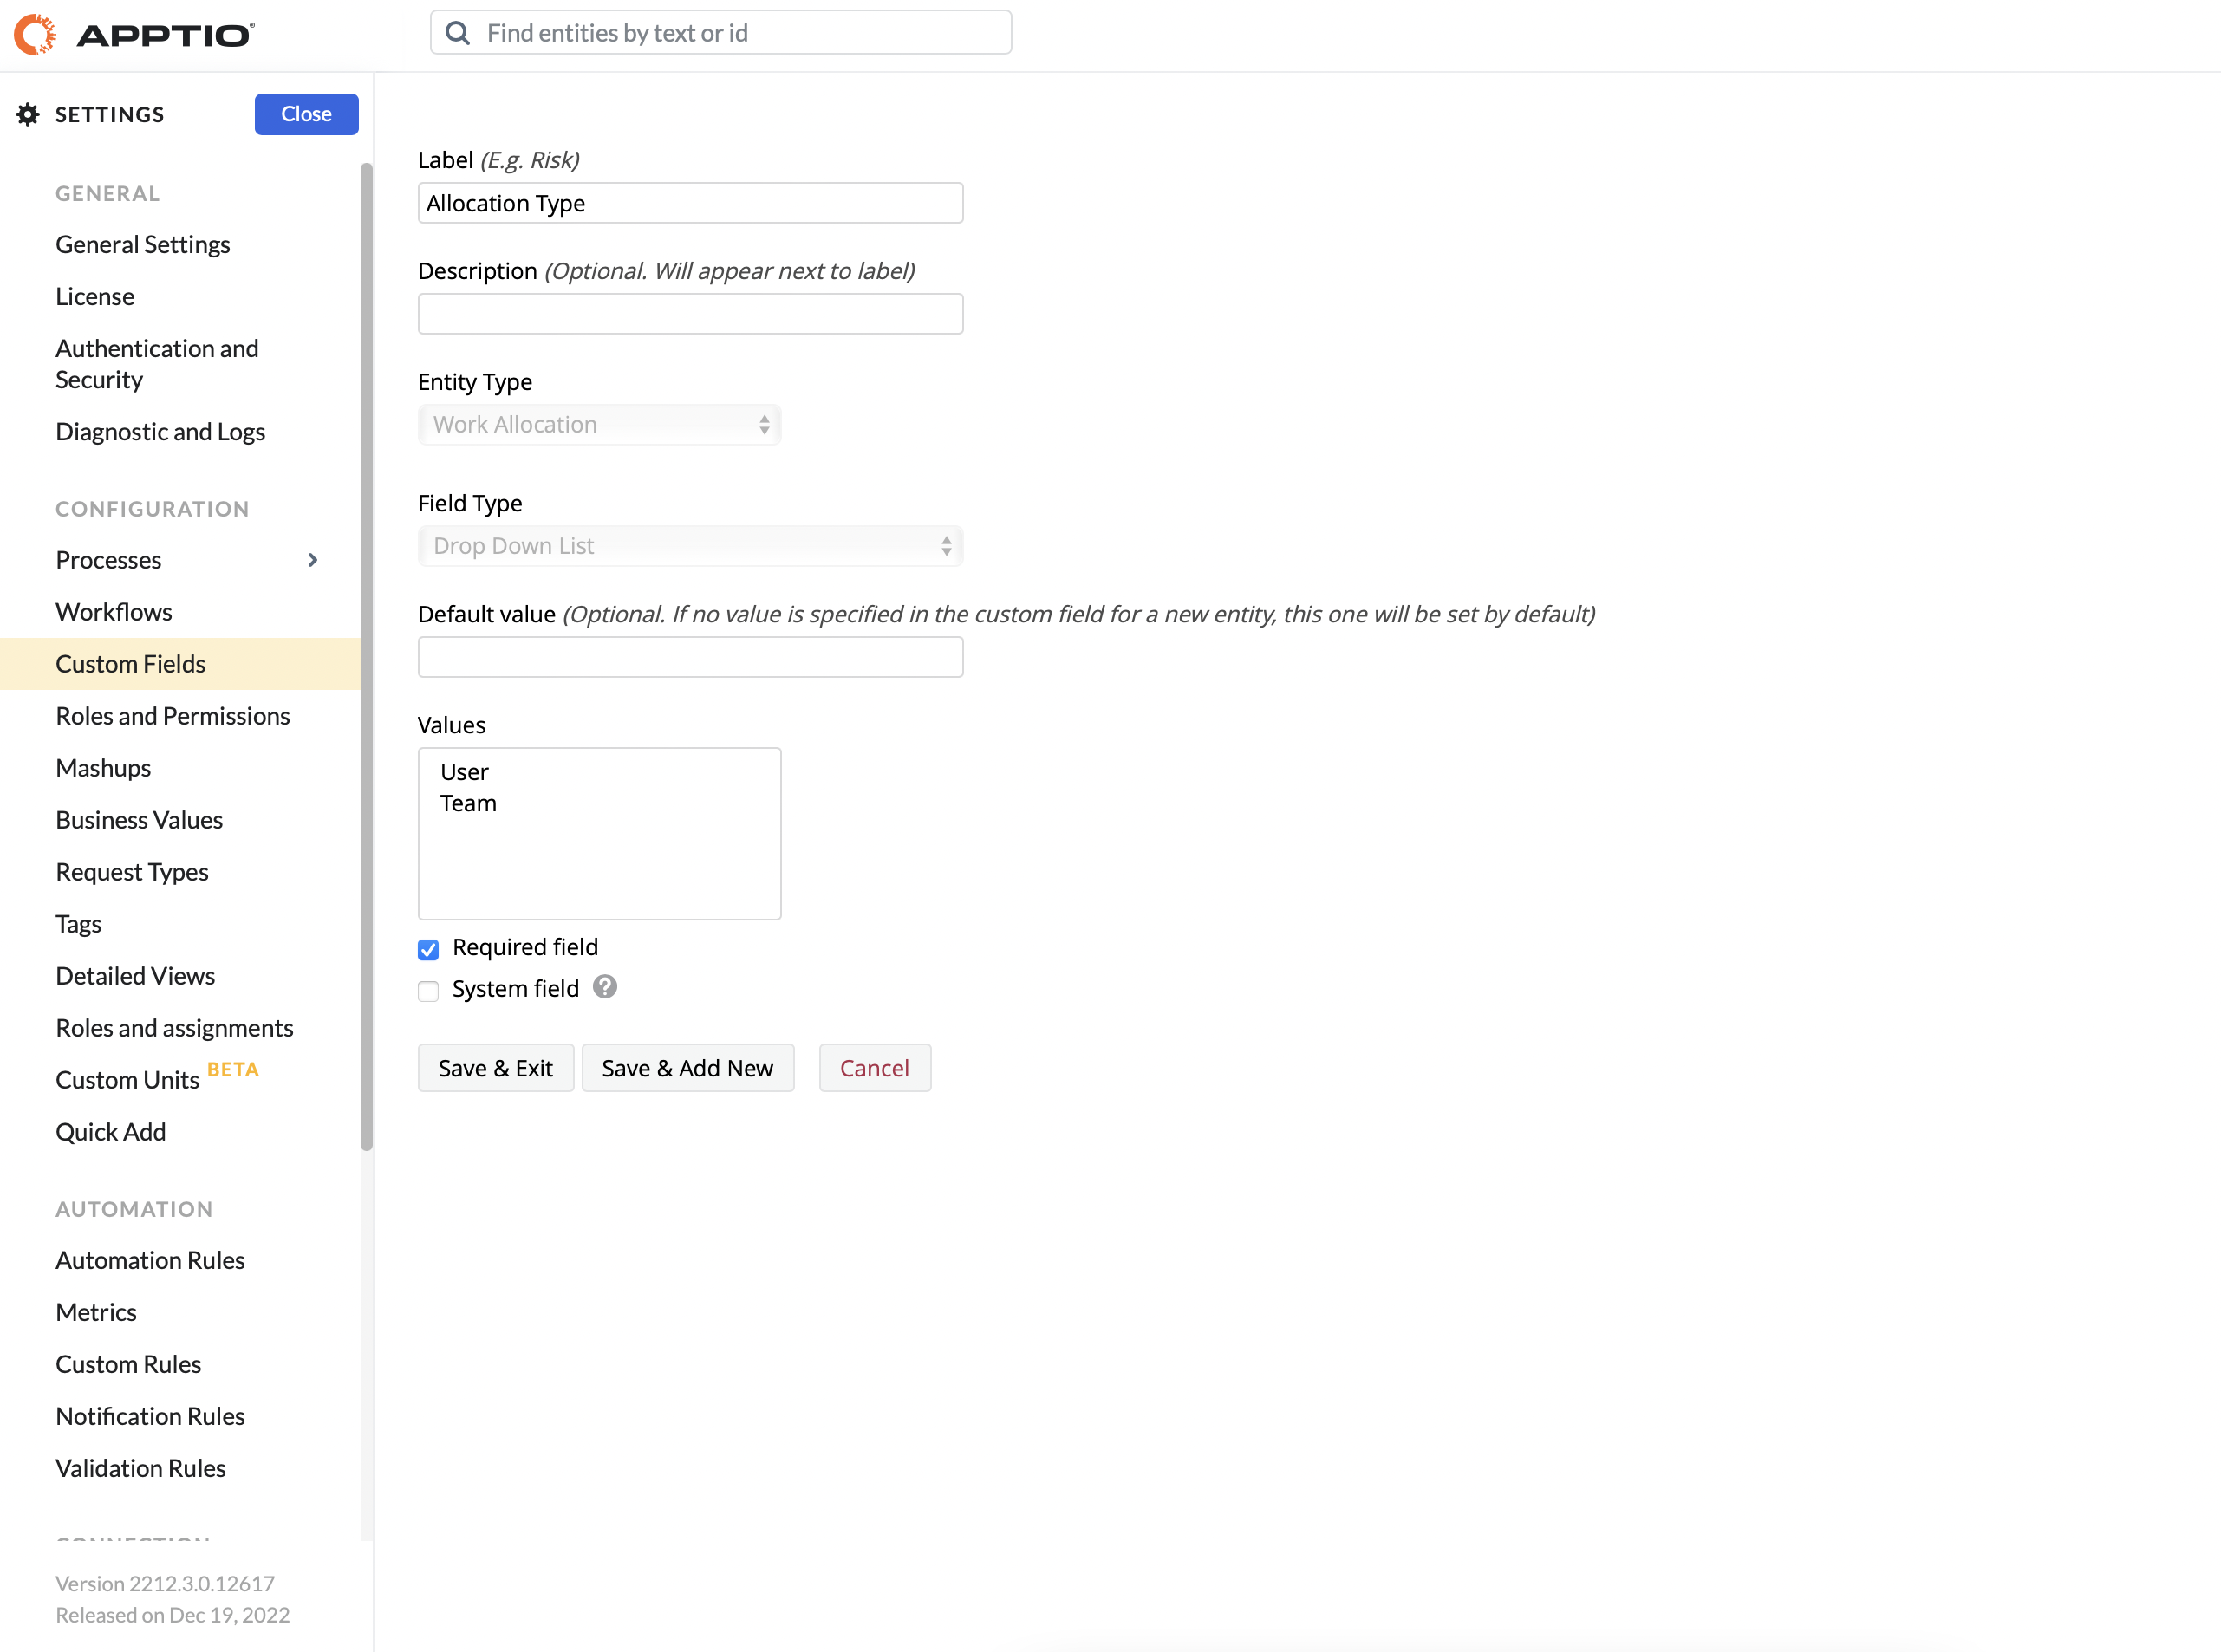
Adjust Allocation Type custom field
By default the custom field Allocation Type contains three values – User, Team, ART – to support all the solutions for User, Team and ART Demand and Allocation. The values in the fields need to be adjusted to match the allocation types you use, i.e. you need to delete those which are not in use, and only leave those which are needed. To do that:
- Go to Settings -> Custom Fields
- Click Edit button next to Allocation Type custom field
- Delete the values that are not needed
- Set default value equal to the type of allocation you need if only one of them (User, Team or ART) is used
If you use Work Allocations for two or more solutions you need to leave there 2 or 3 needed values: User, Team or ART and leave the default value empty, so people have to choose the needed value when create a Work Allocation.
Add Percentage editable unit
To enable the possibility to edit Work Allocation Percentage on roadmaps you need to create an editable unit for the Percentage field.
- Go to Settings -> Custom Units
- Add Percentage field
After this, you'll see Percentage on Work Allocation cards on roadmaps and will be able to adjust by clicking it.

Update Period Type (only needed if you use Weeks, Quarters, Years or Periods instead of Months)
The solution is installed for Months by default. However, if you prefer to use Weeks, Quarters, Years or Periods instead, you need to adjust the Configurable Dropdown User Allocation mashup and Reports in the solution.
1. Update Mashup
- Go to Settings -> Mashups
- Open Configurable Dropdown User/Team/ART Allocation mashups
- Update periodType value in mashups from MonthPeriod to WeekPeriod, QuarterPeriod, YearPeriod or Period
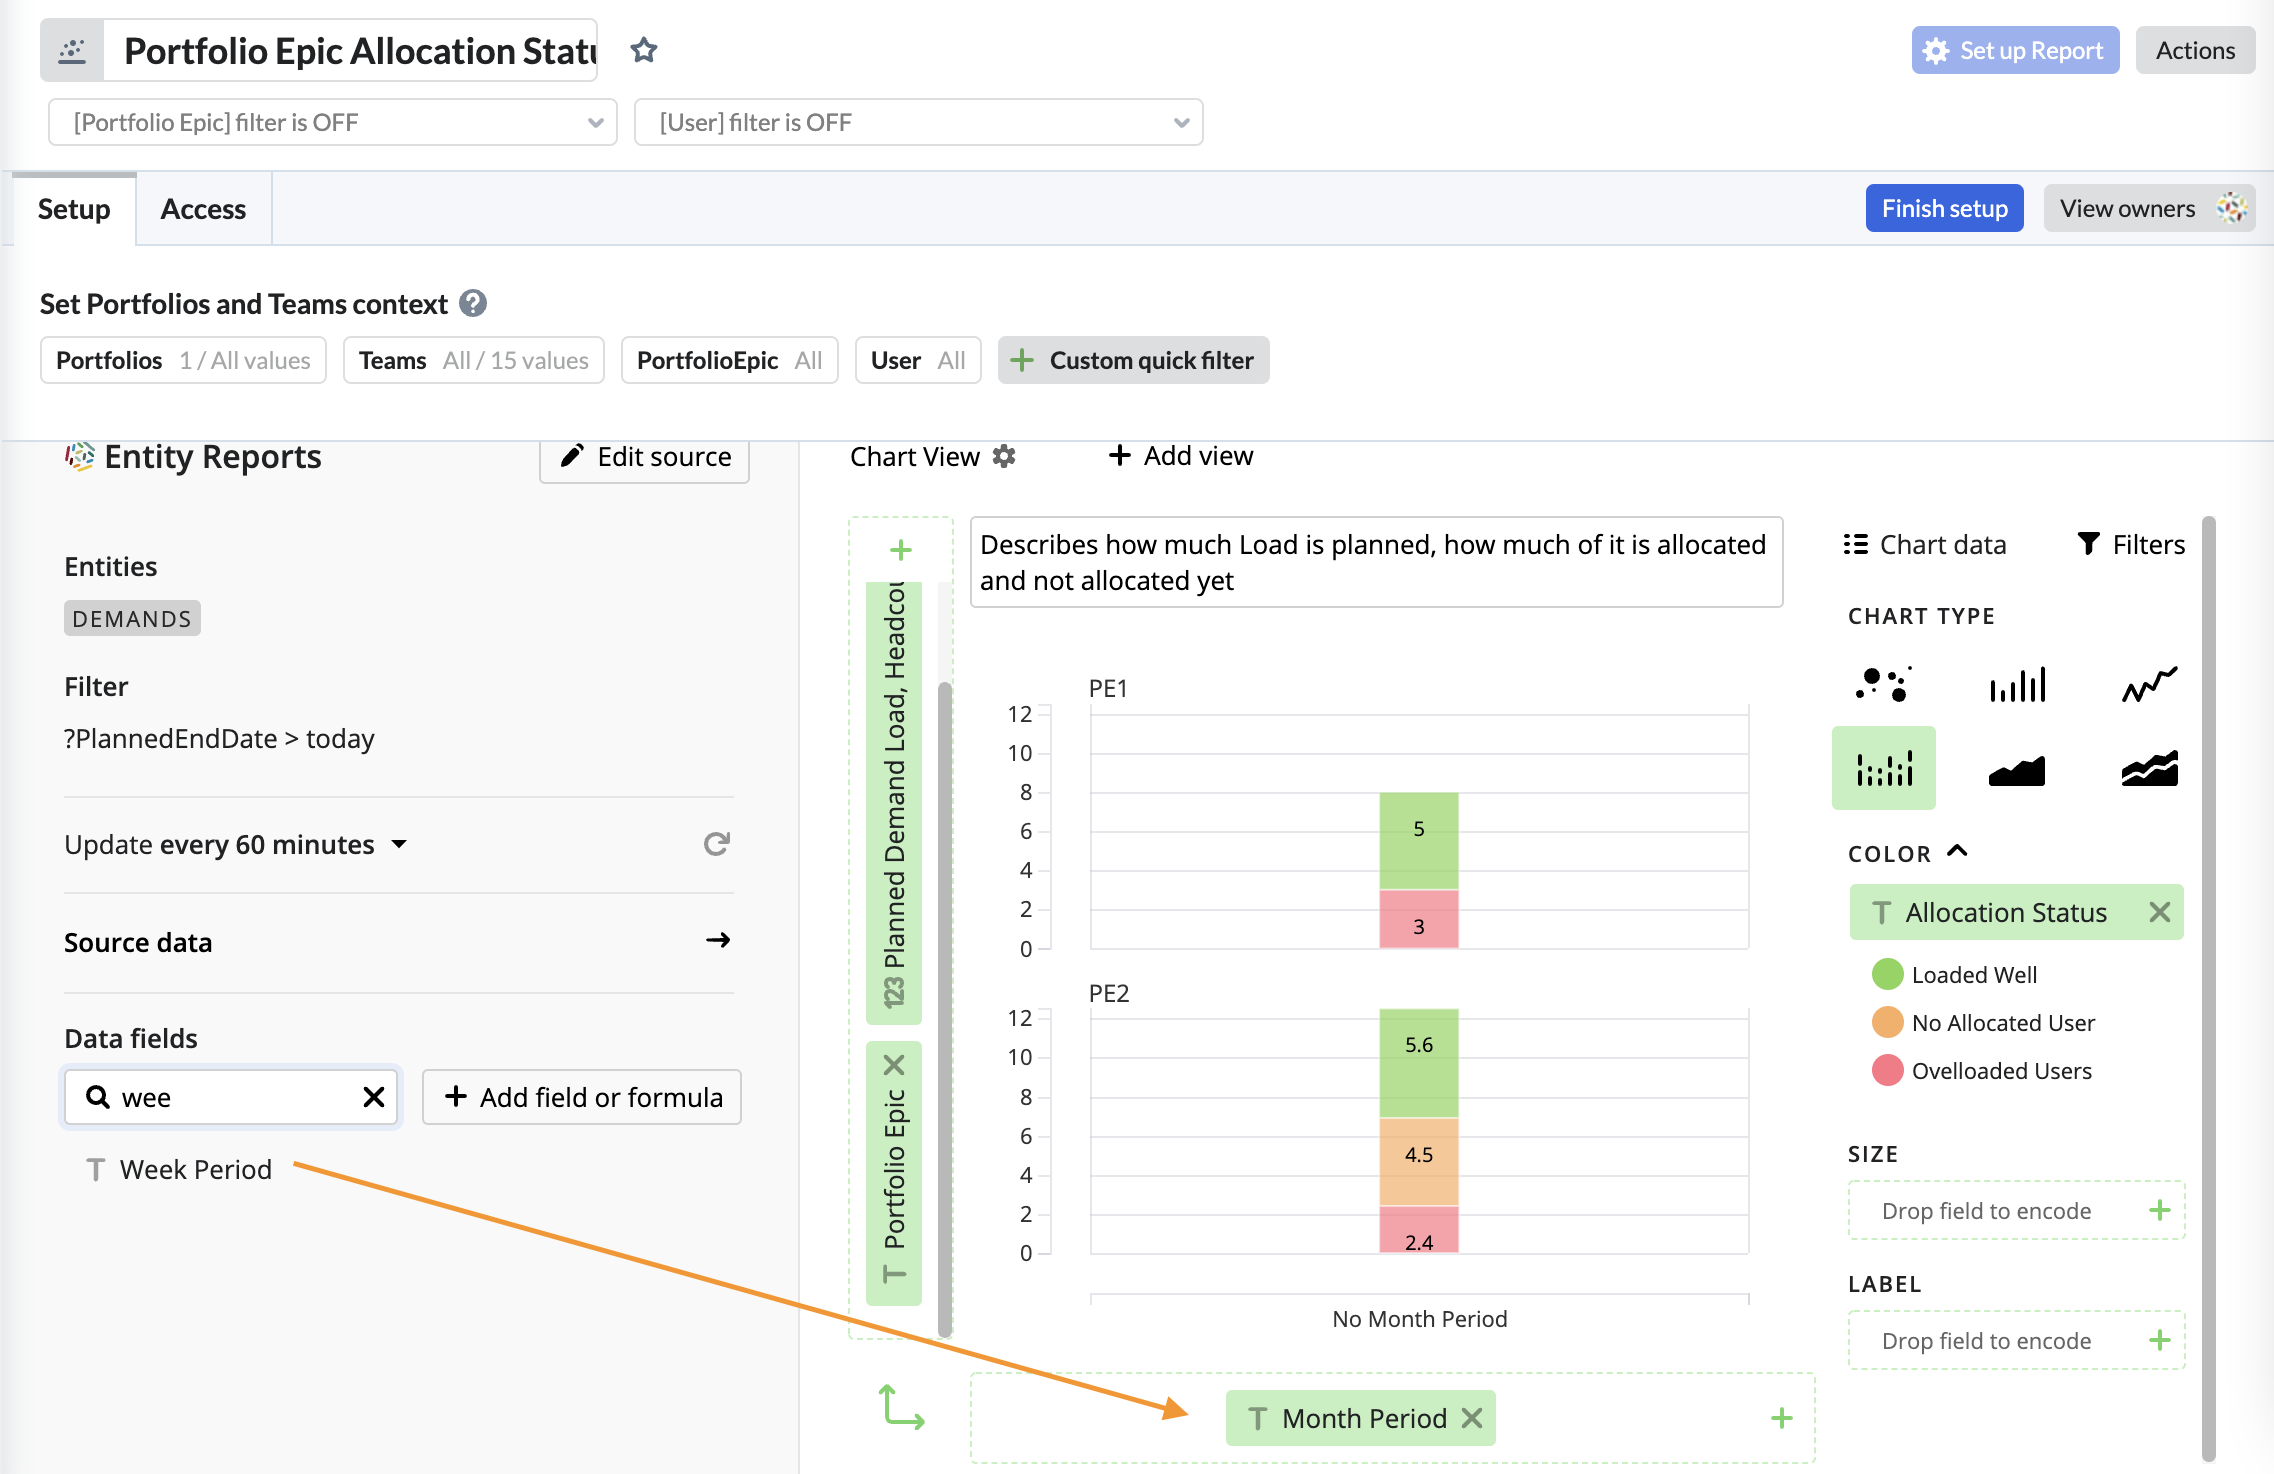
2. Update Reports
There are two reports in the solution which need to be updated with the needed Period:
- Portfolio Epic Allocation Status
- People Load/Teams Load/ARTs Load
To do that:
- Clone the reports (if you do this for Custom Period, not needed for Weeks, Quarters and Years)
- Open the report
- Click Setup up Report button
- Find the needed Period in Data fields
- Replace Month Period on X axe on the report
Integrations
See how Targetprocess aligns and empowers business and IT with the help of powerful integrations.
Targetprocess facilitates enterprise agility at all levels by enabling both Business and IT to work in one holistic solution. To help ensure value flow visibility and collaboration across the entire enterprise, Targetprocess allows a powerful set of integrations covering use cases for different levels and roles within organization.
For Transparency above the Team Level
EXPAND 2 INTEGRATIONS
For Transparency above the Team Level
EXPAND 2 INTEGRATIONS
For Continuous Integration and Continuous Delivery
EXPAND 6 INTEGRATIONS
For Continuous Integration and Continuous Delivery
EXPAND 6 INTEGRATIONS
For Product Management, ITSM, Sales and Marketing to Stay on the Same Page
EXPAND 5 INTEGRATIONS
For Product Management, ITSM, Sales and Marketing to Stay on the Same Page
EXPAND 5 INTEGRATIONS